

How To Repair A Hole In A Fiberglass Boat
Technical Staff Report
In a higher place: When repairing machined holes in fiberglass, whether spiral or a through-hull fitting like the 1 for the pictured seacock, your strategy will depend on the size, purpose, and location of the hole.
Starting time, we will classify the types of holes we are discussing as ones that are round and have been machined, probably with a drill, as opposed to punctures and cracks incurred from damage. The reasons they may demand to exist repaired are numerous: refitting, resizing, removing obsolete equipment, or mistakes. When repairing machined holes in fiberglass boats, the challenge is to determine an appropriate repair strategy. Y'all want a repair that is prophylactic and adequate, but likewise realistic. You want to ensure that the repair is strong enough for the anticipated worst-case load and err on the side of being conservative. Other things to consider include the costs in time and money and the skill required to perform the repair.
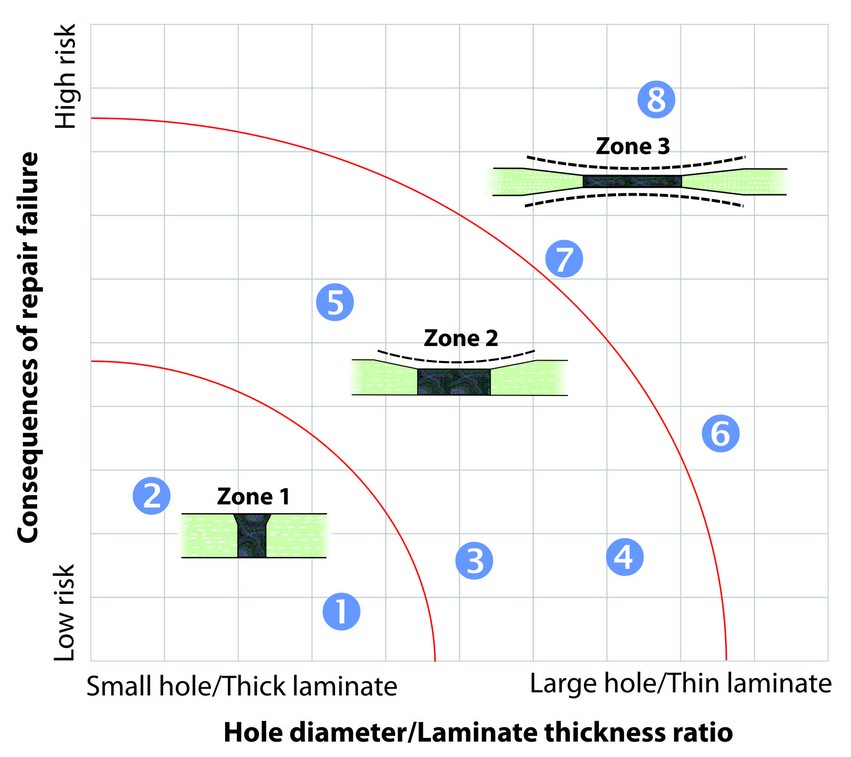
The repair zones to consider when repairing machined holes in fiberglass boats.
Few repairs are identical, and many variables can influence the appropriate repair strategy. In a best-case scenario, a repair tin can be very simple: force thickened epoxy to fill the hole, scrape it flush, and permit the epoxy to cure. At the other farthermost, a repair of structural fiberglass might involve grinding both sides, bonding in reinforcing fibers, sanding the entire repair flush, gelcoating, and finishing to a high gloss. The offset job could take ten minutes and the latter many hours, if not days. There is no tidy repair sequence for repairing machined holes in fiberglass. Start, you lot demand to think carefully nearly each hole. The chart above and this discussion of different types of repair strategies from the simplest to the most complex can help y'all decide the all-time repair strategy for most hole repairs.
Apply this chart by finding a vertical line on the graph that balances both hole bore and laminate thickness. Make up one's mind the consequences of repair failure and find a horizontal line that represents the level of adventure. Where the lines intersect will make up one's mind the importance of repair strength. Repairs that are in the upper correct corner need to be washed very conservatively, and repairs that are in the lower left corner tin place a lower emphasis on strength. The nautical chart also demonstrates the relationship between thickness and hole diameter. A hole with a big diameter is more highly stressed in a thin laminate than in a thick laminate.
Keep in mind that in all repairs, regardless of materials or technique, bonding areas must be Make clean and Dry out and either POROUS or SANDED to provide tooth for good adhesion.
Clean surfaces with an appropriate solvent to remove oil, grease, wax, sealants or other contaminants. Utilize a estrus gun or hairdryer or let bonding surfaces to dry out thoroughly. Sand non-porous surfaces with fourscore-grit paper to provide a texture the epoxy tin can "key" into.
Zone one—Low-risk repairs using thickened epoxy
The following two examples can exist repaired with thickened epoxy because their characteristics put them in the lower left-mitt corner of the chart. They require no additional fiberglass reinforcement.
Example 1
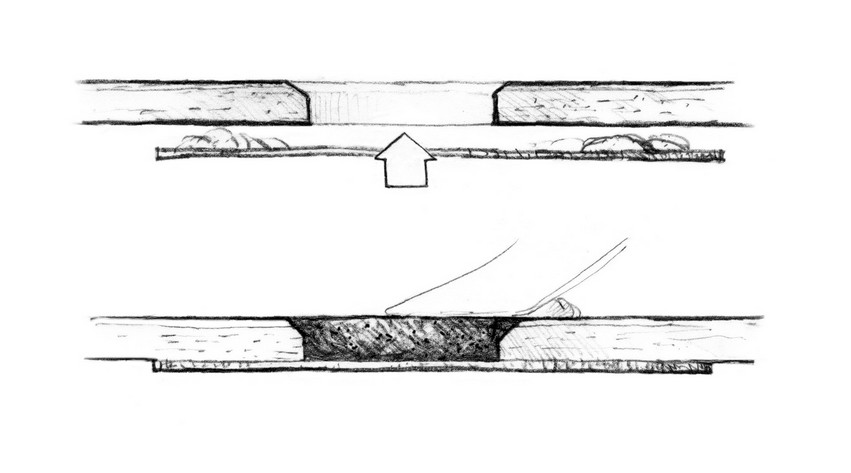
A #viii cocky-borer spiral (just over 1/eight″ in diameter) is removed from the deck of a boat. The deck is one/8″ thick fiberglass skin with a plywood core.
This is a depression-risk repair. The pigsty is small in diameter, the pare is relatively thick compared to the hole bore, and the pare is backed by dense core fabric, plywood. If this repair fails, the worst thing that volition happen is the plywood core may rot someday.
To begin the repair, ream the hole with a drill bit slightly larger than the existing pigsty to expose make clean, fresh laminate and wood. Then chamfer the pigsty with a countersink. Do this on both sides of the hole if you lot can reach the behind. The chamfer softens the abrupt border left from the reaming performance so the repair is less likely to telegraph through the final finish. Additionally, when the hole is chamfered on both sides, a mechanical lock is formed when the hole is filled.
In thicker laminates, removing the screw may outcome in a blind hole, a hole that does not become completely through the laminate. In this example, use a syringe to fill from the bottom of the blind hole. If the hole is deeper than the length of the syringe nozzle, use a soda straw to extend the length of the nozzle. Trying to force thickened epoxy into a blind hole with a putty knife always leaves an air bubble at the bottom of the pigsty. Filling from the bottom forces all air out of the hole.

Repairing machined holes is low-risk when holes are small and in a thick laminate, such as these machine hole screws through fiberglass skin over a plywood cadre.
Use 404 High-Density Filler or 406 Colloidal Silica Filler to thicken the epoxy. Fiberglass laminate is hard and strong and using 404 or 406 Filler creates a hard, potent epoxy filler, which more than closely matches the characteristics of the laminate. A word of caution: These fillers make epoxy hard to sand. When you fill a hole, make clean up around the hole equally thoroughly every bit possible to minimize sanding time.
Follow the standard two-step bonding techniques. Showtime, moisture out the hole with corking epoxy. Even though this hole repair example is considered a low-risk repair, any repair that has the potential to allow water into your gunkhole deserves the best possible bonding techniques. Y'all will exist able to slumber amend at night if the repair is done correctly.
Example 2
A ½" diameter hole passes through the transom beneath the waterline. The transom has fiberglass skin on both sides of a 2″ thick plywood core. There is no access to the backside of the hole.
This hole has a risk factor like to Example 1, that is, low-hazard, below the waterline. Information technology is depression risk because the pigsty is deep and at that place is a lot of surface for the plug to bond to. In addition, the pigsty has very little surface area exposed to the water so there is very little pressure trying to button the repair through the hole. Besides, the hole is not located where it will be subject area to touch or pounding.
Prepare this pigsty by reaming and countersinking equally described in Example ane. Because there is no access to the inside of the transom, y'all should install a plug in the hole to go along the epoxy from running through while it is curing. You tin make a plug by saturating some blazon of absorptive material with epoxy and forcing the moisture plug to the back of the hole. Cotton assurance, foam earplugs, foam prophylactic from a pillow, paper towel, Kleenex, or any other absorbent fabric will work. Once the plug is in identify and at least partially cured, end the repair.

Another example of a low-adventure machined pigsty repair is deep and there is a lot of surface surface area for the plug to bond to, especially if very little of the surface area is exposed to h2o.
Zone 2—Medium-risk repairs using solid wood plugs and fiberglass patches
Median hazard in repairing machined holes in fiberglass would involve a larger pigsty in an area of thinner laminate, such equally a 1″ diameter hole in a cockpit seat hatch.
The adjacent iii examples are repaired through a combination of filling with thickened epoxy, bonding solid plugs in place, and using laminates of fiberglass. These repairs autumn into the middle of the chart with some higher risks, larger holes, and thinner laminates.
Example iii
A one″ diameter pigsty exists in a cockpit seat (lazarette) hatch. It'southward a solid ½" thick fiberglass laminate with no core. The topside has a gelcoated non-slip pattern (a type of pyramid). The underside is not an upshot cosmetically and is accessible by opening the hatch.
Although the safety risk is low, you want a strong repair to reduce the take chances of having the seat scissure in utilize and avert time to come repairs. The most difficult office of this repair will exist the time-consuming work of matching the color and not-sideslip pattern of the gelcoat surface after the pigsty is filled.
Sand the within surface of the hole to expose clean laminate. Also sand a 3″ diameter area effectually the hole, on the underside of the laminate. Chamfer the top lip (the gelcoated side) of the hole, nigh ½" back, with a countersink bit or a rotary abrasive tool.
Wet out these areas by applying a coat of unthickened (neat) epoxy. So moisture out a piece of fiberglass cloth two½"-iii″ in diameter and apply it to the sanded area on the inside of the hatch. Allow it to cure to a soft gel. Then fill the hole flush with the surface, using epoxy thickened with a Westward SYSTEM™ loftier-density filler.

On the left, low-stress holes are filled with thickened epoxy. On the correct, highly stressed holes call for fiberglass patches at a 12:1 bevel.
If matching the non-slip blueprint is important to y'all, we recommend flexible non-sideslip mold patterns that are available for molding the exact blueprint over the repair.
Example iv
An musical instrument is eliminated and at present a 2″ diameter hole exists in a bulkhead, which is fiberglass with a plywood core.
Although it is a larger hole, this is not a high-risk repair since the hole has existed without weakening the boat and is not underwater.
Sand the inside of the hole to expose clean woods. Cut a 2″ bore wood plug that matches the thickness of the original plywood core. And so dry fit the plug to clinch a loose fit. Remove the plug and sand a slight chamfer around the perimeter of the hole on both sides of the bulkhead that flares out onto the fiberglass a ½" or then. Mucilage the woods plug in place with epoxy thickened with 403 Microfibers. Allow it to cure to a soft gel earlier filling the depression spots on each side of the bulkhead. Fill the low spots on each side of the plug with a layer or two of half dozen-12 oz fiberglass cloth if the surface area will be exposed to bear on or corruption.

Fiberglass patches on the top and bottom at a 12:1 bevel cover an epoxy puck in this high-chance seacock through-hull repair.
If the surface area will not be highly stressed, you can fill the depression spots on either side of the plywood plug with epoxy thickened with 407 Low-Density Filler or 410 Microlight™. Allow the epoxy to cure before sanding smooth, sealing with a glaze of epoxy, and painting or gelcoating. Refer to Finishing, Department 2.2 of the Fiberglass Boat Repair & Restoration manual for data on painting and applying gelcoat over epoxy.
Instance five
A i″ diameter hole was drilled near the hull bottom through a structural laminated fiberglass bulkhead with a ½" plywood cadre. Bilgewater should non exist immune to menstruation through the pigsty.
Since the repair is to a structural component and needs to be watertight, the consequences of failure are college than in the previous examples. While it is likely that simply filling this hole will provide enough forcefulness, overlaying the plug with fiberglass will provide more than strength and amend sealing. What is needed here is to bail in a wood plug that is a bit thinner than the plywood core so that once the epoxy cures yous can laminate over information technology and maintain the original bulkhead thickness.
Fill the hole with a wood plug using the method described in the previous example and then bevel the laminate at a 12:i ratio on the edges where the new laminate volition overlap onto the original. Apply enough fiberglass to friction match the thickness of the original laminate. Apply pigment or gelcoat over the finished surface.
Zone 3—High-risk repairs requiring additional reinforcing
The last iii examples describe repair procedures used when a more serious situation would upshot if the repair were to neglect. Each repair uses some grade of reinforcing material.
Example vi
3″ diameter pigsty was mistakenly cut through the ½" fiberglass liner. No admission hole exists to the backside.
This repair would meet the criteria in the lower right quadrant of the chart. It is a relatively large hole, and liners are mostly thinner laminates fifty-fifty though they oft provide a structural component to the hull. While the consequences of a complete repair failure would exist quite low, information technology would still be a skillful idea to repair this pigsty by grinding a 12:one bevel around the circumference of the hole and laminating in a layered fiberglass patch, as described in item in our manuals.
A backer plate may be necessary to keep the layers in the patch from pushing through the hole. A simple way to make a capitalist is to moisture out a piece of lightweight fiberglass on a canvas of polyethylene plastic and permit it to cure. Yous tin then easily cut this single thickness of glass with scissors to a size larger than the hole and bend information technology to fit through the hole. Bond this backer plate to the inner surface of the laminate with 1000/five Five-Minute Agglutinative. You can and so lay the fiberglass patch in place without pushing through, squeegee it down and permit information technology to cure. Then prepare this surface for fairing and finishing.
Example 7
A seacock is being replaced with a smaller diameter one. Information technology is located below the waterline. The hole is 2″ in diameter and through solid fiberglass laminate of ½" thick. The new plumbing fixtures requires a 1½" diameter pigsty. Access to the dorsum is good. The bottom is painted with antifouling paint.
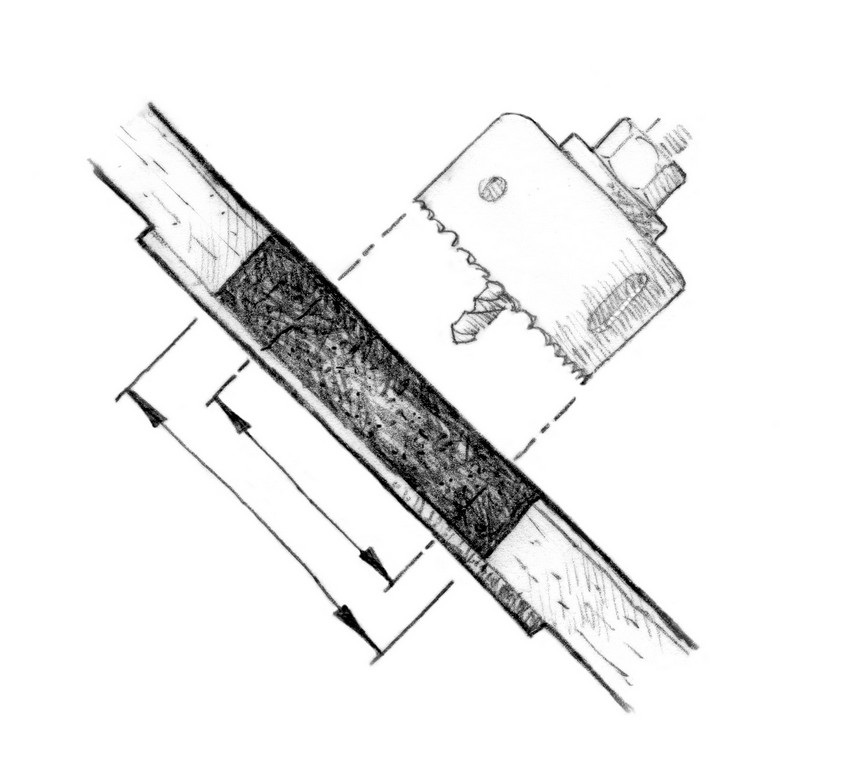
Replacing a thru-hull plumbing equipment like a seacock with a smaller one calls for careful resizing of the hole.
In situations like this, where the deviation in hole diameter betwixt the old and new hole is ½" or less and the screw blueprint for the new thru-hull will be in the original laminate, yous tin get abroad with adding minimal reinforcement from one side. To practice this, sand the inside of the pigsty to betrayal clean laminate, sand the laminate on the backside (4″-5″ diameter expanse centered over the original hole), and apply the reinforcement. The reinforcement could be a layer or 2 of fiberglass cloth with epoxy, a thin layer of cured fiberglass laminate like G-10, or a ½" thick piece of plywood sealed with epoxy.

When the epoxy used in your reinforcement has gelled, utilise epoxy thickened with 403, 404, or 406 filler to fill the hole. After the thickened epoxy has cured, use a hole saw to cut the new hole. Dry fit the new thru-hull plumbing equipment, trimming the fiberglass equally needed. Use the fitting equally a template for locating the new spiral holes. Be sure to seal all exposed fiberglass edges and drilled holes to prevent moisture from wicking into the laminate before installing the fitting with a flexible sealant like 3M™ 5200.
Example 8
A seacock that is located below the waterline is being relocated. The pigsty is 2″ diameter through a solid laminate ½" thick. Admission to the backside is good. The lesser is painted with antifouling paint.
The chart would identify this repair in the upper right quadrant due to the hole'due south location-a hole beneath the waterline certainly raises the consequences if it fails- yet, considering this is a machined hole and not a puncture or impact hole, the repair should exist like shooting fish in a barrel to accomplish. The outset step is to sand the within of the pigsty to expose fresh laminate. Next, pour some mixed epoxy into a 2″ diameter cup to course a "puck" when cured that is near ane/eight″ to 3/sixteen″ thick. Sand the border of the puck and both face surfaces and then dry-fit the puck in the hole so that information technology is centered with regard to the thickness of the laminate. You lot tin and then bond the puck in by brushing a thickened mixture of epoxy and 406 Colloidal Silica on the inside of the pigsty and the edges of the puck. If the puck fits loosely and doesn't stay where placed, utilize duct record to hold it in place until the epoxy cures.
At present grind back about 1/viii″ to 3/16″ (depending on how thick the puck is) thickness from the laminate on both sides of the hole on a 12:1 bevel. This will give the beveled area almost 5″ in diameter. Make full the beveled surface area on both sides with a layered fiberglass patch and epoxy. In one case the patches cure, sand them and an surface area larger than the patch to prep for fairing and finishing. It is especially important to remove all the antifouling paint anywhere epoxy will be applied considering the epoxy volition not stick well to nearly bottom paints.
Nosotros hope the chart and the repair methods described in these examples will help y'all decide how to repair a hole. See likewise our Fiberglass Boat Repair and Maintenance Manual for information on fairing and finishing as well as laminate repairs. By carefully weighing the particulars of the hole and the importance of the repair, you tin make a sound decision on what repair method to cull. This will enable your boat to once again be a pigsty in the water (with a few fewer holes) into which to pour money!
Source: https://www.epoxyworks.com/index.php/repairing-machined-holes-in-fiberglass/
0 Response to "How To Repair A Hole In A Fiberglass Boat"
Post a Comment